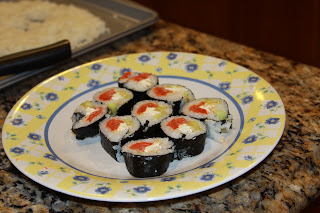
I have always enjoyed sushi. Ever since my first trip to a sushi bar, I have wanted to make my own at home... now that I am older and have more confidence in the kitchen, I make sushi regularly! It is a very light but filling meal and so easy when you get the hang of it.
Most people are squeamish because they think all sushi is raw, but it's not! In the following recipe I use smoked salmon, but you could very easily substitute crab meat or make an all-veggie roll- the choice is yours.
Here are the filling ingredients for my sushi roll! I am using:
3 oz cream cheese
1/4 Japanese cucumber, peeled and sliced thin (you could also use a regular-variety, but be sure to remove seeds- you could also use avocado instead.)
3 oz smoked salmon (you could substitute smoked tuna, crab or leave it out altogether!)
about 1/2 c cashews, crushed
One of the staple ingredients for sushi is nori, or seaweed wrap. I got a package of 6 from my local grocery store. For this recipe, you will need two sheets of nori.
The bamboo mat is a special tool for making sushi rolls. It is not necessary, but it makes things a lot neater! When making sushi, I cover the bamboo mat with wax paper to prevent any spillage on the bamboo, which can be hard to clean. Other people may use plastic wrap, but I find that wax paper is easier to work with.
Sushi also calls for rice, but not any rice! My local grocery sells Sushi Rice, as well as the seasoning for it. You will need 1 c rice for this recipe (rinsed until water is almost clear, then cooked in 1 1/4 c water.) When the rice starts to boil, simply turn off the burner and let it sit, covered, on the warm burner for 20 minutes! To your cooked rice, you will need to add 1 1/2 T rice vinegar (non-flavored), 1 T sugar and a pinch of salt. Stir until mixed.
I spread the rice on a cookie sheet to let it cool while I am heating the seaweed sheets in a warm oven (to make them more pliable). Leave the sheets in a warm oven for about 4-5 minutes.
With wet hands, spread the cooled, seasoned rice onto nori. If you do not keep your hands wet, more rice will stick to you than the seaweed!
When the rice is spread evenly, place 1/2 the filling off-center on top. Then, very carefully, start to roll your sushi away from you on the bamboo mat.
Make sure you do not roll the wax paper into the sushi roll. :)
At the end of the roll, give the sushi a firm squeeze. This is just to ensure that the roll will not unwrap.
Here is sushi roll #1! I had a little spillage on each side... if you are a neat freak, you are welcome to trim this off to make it look more professional. Then, with a wet knife, cut your roll into 9 pieces and arrange on a plate!
Even though this sushi looks good enough to eat right away, you need to make the second roll while the nori is still warm! :) Be sure to serve your sushi rolls with naturally fermented soy sauce and wasabi paste- everyone will be amazed that you made these yourself! Enjoy!
I wanted to show you my 7-year-old's chopsticks! We found this neat little gadget made especially for kids, and I had to get one. We call them his "clothes-pin chopsticks" because they have the same spring mechanism of a clothes pin... and they are great for little hands.


