Pages

Sunday, February 27, 2011

Homemade Bar Lotion

I use lotion every day. During the winter, when we have to turn on the heat occasionally, my skin needs that extra moisture even more!

I have made cream lotions, but they actually contain more water than oils! I find the moisture is short-lasting, although easily absorbed into the skin. For winter moisture, I prefer bar lotions. This type of lotion is not watered-down at all! It is 100% natural oils that moisturize your skin to the fullest, and they take very little effort to make.


I can make 4-1.5 oz bars from this simple recipe:

1.5 oz beeswax
1 oz cocoa butter (very moisturizing, and good for scarred skin, too!)
1.5 oz Shea butter
2 oz liquid oil (either olive oil or avocado oil)

Melt oils and beeswax in a small saucepan over low heat.
Remove from heat and add 1/4 t vitamin E and about 5 drops of your favorite essential oil
Pour into molds and let harden! If they get stuck in the molds, simply pop them in the freezer for an hour or so.

To use:
Rub the bar in your hands to warm.

I have used this as a facial moisturizer, and it works great on feet and elbows, too!

This post has been shared at Monday Mania

Saturday, February 19, 2011

Homemade Beef Stroganoff

I have to admit, when I was a new bride I couldn't cook worth a darn. Boxed dinners were my crutch, and "homemade" was not a word used in my home... My husband is a "meat and potatoes" man, so I was always searching for something to mix with hamburger, and boxed dinners were sooo convenient!

Twelve years later... I have learned from my mistakes and added "homemade" to my cooking repertoire. My Mother-in-law has taught me how to cook my husbands favorites, and I have changed up the recipes on quite a few to make them more nutritious. I'm learning all the time.

My husband is still a "meat and potatoes" man, so I'm always looking for yummy, meaty recipes for us to try. Beef Stroganoff has always been one of our favorites, and it is very nutritious if you make it with organic vegetables and homemade broth. (Not to mention a great way to boost your immune system this flu season!)


What you need:

1.5 lb lean beef, cut in strips 1/4"-1/2" thick and about 2.5" long x 3/4" wide
5 T butter, divided
1 c sliced mushrooms (I omit these, as my family won't eat them!)
1 medium onion, chopped
2 T flour (or 2T arrowroot powder + 2T water)
2 c beef stock
2 T tomato paste
1 t dry mustard
2/3 c sour cream
sea salt and black pepper

Dust strips of beef with sea salt and black pepper, then let them sit while you prepare the vegetables.

Melt 2 T butter in a heavy skillet, and saute mushrooms until tender. Remove and set aside.

Melt more butter, if needed, and saute onion in same pan until caramelized. Remove and add to mushrooms.

Add at least another T butter to skillet, then brown meat on both sides in small batches.

(Add butter when needed.) Remove beef and set aside with mushrooms and onion.

Add 2 T flour to skillet and mix with meat drippings and left-over butter. Brown it well, mixing constantly. (If you prefer to use arrowroot powder, add 2T arrowroot mixed with 2T water after simmer.)

Slowly add 2 c beef stock to form a smooth gravy.

Add tomato paste and mustard, blending well.

Next, add meat, mushrooms and onion and let simmer on low heat, covered, for about 20 minutes. (Add 2T arrowroot + 2T water now, if desired)


Five minutes before serving, add the sour cream and blend thoroughly. Season with sea salt and black pepper, if desired.

Serve over long grain rice or mashed potatoes!


Saturday, February 12, 2011

Salt Is GOOD For You!

A friend of mine is trying so hard to lose a little weight. She has succeeded in losing 30 lbs already! But, now that most of the weight is off, her blood pressure is high. Her problem reminded me of an article I read about refined salt and its effects on the body. I asked her what kind of salt she used, and sure enough, she showed me a container of processed "sea salt".
Just because it says "sea salt", don't think it's any better than the cheaper "table salt" that is sold on the same shelf! If it is white, chances are it has been stripped of its trace minerals. A simple rule to go by is: Don't buy white salt. The salts I use are pink and grey...

Salt (in moderation) is actually good for you. I am talking about the God-given, natural, mineral-rich salt that comes from our Earth's many salt deposits and oceans. The only thing it has in common with refined, white salt is that it also contains sodium chloride. That is where the similarities end.

In Debbi Pearl's article, Salt is Good , she explains that high blood pressure (as well as other conditions) is brought about by a mineral imbalance. This imbalance is caused by eating refined, mineral-stripped salt and products that contain refined salt. It makes total sense to me! Natural, unrefined salt has minerals that help your body function- without these essential minerals, how can you expect your body to function as it should?


Trace minerals are necessary for your body to function properly. Redmond Real Salt, a pourable, pink salt from an ancient sea bed in Utah claims to have over 50 minerals in addition to sodium. This is the salt I serve to my family in a shaker on the table. It not only seasons their food but gives them many trace minerals without having to swallow a pill.


Celtic Sea Salt is a grey salt made in northern France from sun dried ocean water. It is the chosen salt of gourmet chefs. I have used this salt for cooking in liquid because the crystals can be very large and season best when dissolved. It is not ideal for putting in a salt shaker, and can stick together because of its high moisture content. Celtic salt contains all 82 of the essential trace minerals a body needs to function properly! It replenishes electrolytes to prevent dehydration and can be good for digestion.

I use unrefined salt to keep my body in balance. Try it and you'll see!

For more information on salt, please read this article by Jon Barron, author of Lessons From the Miracle Doctors- A Pillar of Salt


disclaimer: I am not a doctor. I urge you to do your own research on salt before making any dietary changes for yourself or your family.

Saturday, February 5, 2011

Homemade Steak Seasoning/Horseradish Sauce

Wow. My husband whipped up a delicious dinner tonight! Yes, he cooks too, only his kitchen is in the back yard... Tonight we had steak with "Outback"-style seasoning and a horseradish-dill dipping sauce. If you enjoy the taste of Outback steaks and Tiger Dill sauce like we do, you will LOVE this healthier homemade version!

Steak seasoning:

2 t fine sea salt
1 t paprika
1/2 t black pepper
1/4 t onion powder
1/4 t garlic powder
1/4 t cayenne pepper
dash coriander
dash turmeric

Mix spices well.
Sprinkle generously on both sides of steak and let sit 10 minutes before grilling.

Horseradish Sauce:

1/2 c sour cream
1/4 c prepared horseradish (I used Gold's Horseradish- it was the ONLY one at the store with no preservatives or MSG!)
about 1 t dried dill weed (taste and add more, if desired)

I ate this sauce on my very rare steak tonight, and it was like eating a little bit of heaven!
Enjoy!

Note: You can google any of your favorite chain restaurant's recipes to find copycats. I have done this with salad dressings and meat seasonings. Then, all you have to do is substitute real, healthy ingredients and make it better at home! (For instance, substitute coconut oil for vegetable oil, sea salt for processed salt, or butter for margarine- it's that easy!)

This post is part of Monday Mania on the Healthy Home Economist

Saturday, January 29, 2011

Homemade Stevia Extract

In his book, Healing with Whole Foods, Paul Pitchford warns, "Obtain only the green or black (whole) stevia extracts or powders; avoid the clear extracts or white powders, which, highly refined and lacking essential phyto-nutrients, cause imbalance."
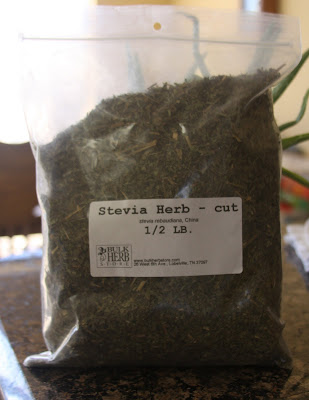


Stevia is a miracle of natural sweeteners. While it is 30-300 times as sweet as granulated cane sugar, it has NO calories and is safe for diabetics! If extracted correctly, there is very little to no aftertaste and it can be stored in your refrigerator for up to three months.

When choosing an herbal extract at the store, observe the color of the extract. Good quality extracts will be from green to almost black in color, and they will be packaged in dark-colored glass bottles. As mentioned above, do not buy refined stevia- clear extracts and white powder stevia have been refined. It is hard to tell the age of an extract, except by the expiration date on the bottle. For this reason, I like to make my own, fresh extracts!

I got a bag of dried, organic stevia from my favorite online herb store (http://www.bulkherbstore.com) a while back, and I meant to do something with it... why not now!?
For those of you who followed my other blog, you know that I have made extracts from medicinal herbs. They usually take 3 weeks to reach full extraction. Since I am only extracting the sweetness factor (and NOT the medicinal properties) of the stevia, it will take much less time! You will only need to dedicate about 2 days from start to finish.

What you will need:

clear alcohol (eg. rum, grain alcohol or vodka)
1 jar with a tight-fitting top
dried stevia herb
cloth or coffee filter
small-med. cooking pot


1. Fill your jar about 1/3 of the way with dried stevia. The size of the jar doesn't matter!

2. Fill your jar to within about 1"-2" from the top with whatever alcohol you have chosen.

3. Screw on the top and shake, then leave the jar on the counter in your kitchen.

4. Agitate the jar several times over a 48 hour period. Every time you walk by, give it a shake!

5. Filter your extract through a cloth or coffee filter into a cooking pot.

6. Bring your extract to a simmer for about 30 minutes. This will boil off the alcohol and condense the sweetener.

7. Store your extract in the refrigerator for up to 3 months!


My final product was almost black, with a green tint to it. Total time spent on this extract was: 48 hours on the counter + 30 minutes simmering, and it will last for 3 months stored in the fridge!

Be sure to test your extract to see how much you will need for coffee/tea. Start with small portions (use an eye dropper- you can find them in the pharmacy), as 1t stevia extract =1 cup granulated sugar in concentrated amounts!

Wednesday, January 26, 2011

Homemade Hair Detangler

My oldest daughter used to have hair down to her bottom, and boy was it hard to keep neat! It didn't help that she didn't like having her hair brushed. We got store-bought detangler and it worked, but I didn't like the ingredient list one bit. Really, there was more than one ingredient I couldn't even pronounce! I was inspired to make my own detangler when I came across an herbal product online called "Hair Shine" by http://www.beeyoutiful.com/ ...


In my homemade detangler, I use:
2 oz aloe gel (try to find the purest aloe you can- NOT the green aloe for sunburns.)
5 oz distilled water
20 drops orange essential oil
20 drops lavender essential oil
8-10 drops rosemary essential oil
4 drops grapefruit seed extract (optional- for freshness)
I re-used an old detangler spray bottle (I've used the one in the picture for about 3 years!) to mix all the ingredients together. This concoction is best when used on dry hair, in between washings. Shake well before use :)

Friday, January 21, 2011

Homemade Sunscreen

We are having a homeschool field trip to Sanibel Island this week, and I noticed that we have used up all of our sunscreen. Although some sun exposure is good for your vitamin D levels, spending all day at the beach with no sun protection is a sunburn waiting to happen.

Drugstore sunscreen is no longer allowed in my home because of the chemicals used in them. These chemicals actually penetrate your bloodstream and flow through your body- I would rather use a sunscreen that protects my kids from the outside.


Here are the ingredients for my homemade sunscreen:

48 g liquid oil (I use either sweet almond or olive oil)
52 g coconut oil
20 g emulsifier (this is to mix the water and oil)
10 g stearic acid (this is a thickening agent)
380 g water
35 g zinc oxide- at this amount, the sunscreen will be approx. SPF 20
10-20 drops essential oil (NOT sweet orange, which can make your skin sensitive to sunlight.)


Heat all ingredients except zinc oxide and essential oil in a stainless steel pan until hot but not boiling. Then, mix with a stick blender until everything is incorporated and creamy- be careful as this mixture will be hot. Once it is mixed, you can add your zinc oxide and mix again with the stick blender. If you are adding essential oils, wait until the mixture has cooled to add them.


Here is the finished product! It is thick and looks a lot like store-bought sunscreen. This is not completely waterproof, so re-apply after swimming!


I put my sunscreen in a recycled lotion bottle with a pump. This makes it easier for the kids to re-apply themselves!