Pages

Wednesday, December 26, 2012

Homemade Shampoo and Conditioning Rinse


I am really excited about this post!  Homemade shampoo has been on my list of "things to do" for quite a while, but I hadn't found a recipe that really caught my eye until now.  (Check out the inspiration for this post at Instructables!)  The recipes are simple and can be tailored to any type of hair. 
 
My hair is fine and thin, so I paired my homemade shampoo with a vinegar rinse.  The rinse will help with any heavy feeling that is left after shampooing.  Without the rinse, my hair feels like I have a lot of product in it- even though I could use some body, I cannot use this shampoo without a rinse.  
 
I have a good friend who has naturally curly hair, and she uses her normal conditioner with this shampoo, with excellent results!  She told me her hair feels light and clean, just like after a trip to the salon :). 
 
Here's what you'll need for your own homemade shampoo:
 
1/2 c castille soap (I used Dr Bronners Citrus Hemp Castille Soap)
1/2 c water
2 t jojoba oil
2 t glycerine (I used a homemade green tea extract in glycerine)


Mix all ingredients in a large, glass measuring cup, then pour into dispensing bottles!  Make sure to shake well before using.  I squirt this directly into my wet hair, as it is very watery (but it makes amazing lather!).

For a vinegar rinse, just use 1 quart water (or tea- I used a strong linden leaf tea) and 3/4 c vinegar (you can use whatever kind you have on hand- I used apple cider vinegar).  Mix.

Use 1/2-3/4 c per rinse- just work through your hair to your scalp and leave it on while you wash your body.  Then, rinse and let your hair air dry!  When it's dry, no vinegar scent :)  Enjoy!

Tuesday, December 18, 2012

GAPS Diet, Days 1-5

For those of you who don't know, the GAPS diet (outlined in Dr. Natasha Campbell-McBride's book, Gut and Psychology Syndrome) is a diet designed for healing the gut and improving overall health.  Since our immunities are located in our digestive tract, it is logical to believe that with better gut health comes better overall well-being.

Since beginning the diet last week,  I have had my ups and downs which include a bit of detox and frustration over planning meals that are not based on wheat and starchy foods.  Although I have adopted a more traditional diet over the past few years, I am still struggling with meal planning.  I think this diet is even more frustrating because I have one very picky eater (one out of four ain't bad) who has refused to try almost everything I have set in front of her...

There have been some very satisfying accomplishments, as well.  My picky eater has tried two new foods that she would normally turn her nose up at, and my youngest son will try (and enjoy) anything and everything I put in front of him.  My own health has also started to improve!  I feel less "full" when I wake up, and my sleep has been more restful.  I have also had some itchy skin issues, which have started to subside since starting the diet.  Although I am experiencing detox symptoms (both emotional and physical), I believe the pros outweigh the cons of continuing with the new menu!

Just a recap of these past few days:

almond flour pizza

Day one:

We tried our first new recipe- pizza, made with almond flour crust.  I wanted to start with something familiar so that it would be less traumatizing for the kids.  This was a wise decision, and three out of four kids enjoyed the meal, especially when I warmed up some garlic butter to dip the pizza- YUM.  This recipe is a keeper.

Although the GAPS book states that bone stocks are good for digestion, I have yet to get any of my kids to try them... I have about 5 gallons of turkey, chicken and beef stock on hand for any takers.  I don't relish the flavor, but I can get down a cup at a time (with a little added Celtic salt).


almond flour bread

Day two:

Okay, I went a little crazy with the almond flour today.  I found a great website called Elana's Pantry , which has amazing resources for special diets, including grain-free recipes.  I made her almond flour bread (a BIG winner for my "picky eater"), almond flour biscotti, and got countless other recipes to try down the road.  A big "thank you" to bloggers like Elana who make my life easier!

I made my first batch of soup today- made with chicken stock, carrots, zucchini, garlic, homemade sour cream and various herbs.  I blended it up with my immersion blender (my kids don't like chunky soup) and it was fantastic.  I made enough for two meals.

For dinner, we ate fish cutlets with homemade ketchup ( recipes in the GAPS book recipe section) and vegetables.  Only two of the kids liked them.  Oh well!


almond flour biscotti

Day three:

Made almond flour pancakes today (another Elana's Pantry recipe), and they were a hit!  Good thing, too, because the rest of the day was a flop... I got frustrated with a couple new snack recipes (don't ever say something tastes just like cheesecake if it really doesn't!  That was cruel.), and I have vowed to stick to more familiar things in the future.  Oh, one more thing... if you've never tried to make "ice cream" from frozen bananas and you don't like bananas, just don't do it.  It tastes like bananas- even when you mix it with homemade peanut butter.  Really, take my word for it.

I have found that some of my go-to recipes fit the GAPS recipe criteria, so I am trying to stick with familiar items I know my kids will eat.  My French roast chicken is a great choice for my family!

Day four:

I am so glad eggs are on the GAPS menu!  Although my kids don't like runny yolks (like the diet recommends), they are more than willing to eat our chickens' eggs for breakfast, lunch and dinner.  I may try adding things to their scrambled eggs, like spinach or tomatoes... We are also lucky to have a butcher shop right down the street that sells fresh pork sausage and bacon!  These are staples in our breakfast menu.

The kids are not thrilled with taking probiotics in capsule form, so they are starting every day with a small glass of kombucha, flavored with fruit.  I am sticking with a daily probiotic in addition to my regular consumption of kombucha.  Probiotic intake is crucial to rebuilding good flora in our guts.  I am also trying to get the kids to try fermented veggies, but haven't had much luck- my youngest son will eat the smallest amount of my homemade kimchi, which is a good start!

We went to a youth group meeting tonight and the kids totally fell of the wagon- I let them decide what to eat, and they all ate at least one or two homemade Christmas cookies.  I had a sip of some blueberry cordial, so they weren't the only ones cheating...

I am definitely feeling some detox symptoms today.  I feel a bit tired and very, very irritable!  And my face has broken out badly- for the first time in quite a while.

Day 5

I made beef liver pate'.  I have always liked pate', but it turns out my kids don't.  Another failure!

For dinner, I made white beans (great northern, or navy) and ham in beef broth- my younger two liked them to the point they wanted seconds!  I think it helped that I seasoned them with a small sprinkling of Cajun spices.  My older son ate it, but didn't care for it... my picky eater said she wasn't hungry.

I am feeling a bit better today.  Detox symptoms have started to subside, and I have more energy.  It will take a while for my face to clear up, but no new blemishes!

I am determined to stick with the diet for as long as I can.  My kids may or may not follow my lead.  It will be a long journey but hopefully worth the effort.  :)  Since I will be on this diet long-term, I will not be updating daily, but my posts will reflect my new diet.  I am excited about learning new recipes and sharing them with you!  Enjoy!


Wednesday, December 5, 2012

Prepping for the GAPS Diet!

Well, I did it!  I got the book Gut and Psychology Syndrome, by Natasha Campbell- McBride MD.  I have been wanting to try the "GAPS" diet for such a long time, and now I have the tool to try it.  For the past week, I have read through the pages and my eyes have been opened!  Now that I am educated about gut health, I am preparing for Day 1 of my new lifestyle (and I'm taking my family along with me!). 
 
The recipes section of the book is a great way to get ideas for ways to improve probiotic intake through food choices.  In the picture below, I have taken Dr, Campbell-McBride's recipe for fermented vegetable medley and tweaked it a bit.  Isn't it beautiful!  It should be ready after 1-2 weeks of fermentation.


I will be posting updates on how we are all doing on the GAPS diet and what benefits we are noticing from it.  I am both scared (I have one extremely stubborn picky eater) and excited, so we'll see what happens in the next few months... :)

Homemade Warm Coconut Oil Drink


I am a long-time fan of virgin coconut oil.  It is a quick energy boost when you are feeling tired, and it tastes delicious!  The only problem I had with coconut oil is how to get enough in my diet... in smoothies, the coconut oil solidifies and leaves you with little chunks that need to be chewed.  I tried to put some in my cup of green tea, but it was like drinking an oil slick!  In my coffee/milk drinks (cappuccinos, lattes), it was easy to get down, but my body is very sensitive to coffee drinks and caffeine so I don't drink them every day.

Now, I've found the perfect solution for taking my daily dose of coconut energy- a warm drink that is perfect on a cold winter day!  Here's what you'll need:

about 2 c warm milk ( I used raw milk, heated on the stove top until it was about 110 degrees F)
1 heaping T coconut oil
1 t raw honey

Mix all the ingredients together and sip away!  Milk and honey are always good together, but the added coconut oil gives it just a hint of flavor.  And, the oil seemed to mix well with milk fat- no more oil slick-type beverages!  :)

So, give your body a boost of coconut energy and enjoy it!


Saturday, November 3, 2012

Homemade Birthday/Anniversary Cake and Cream Cheese Icing

This is, hands-down, the best homemade cake I have ever eaten.  If you top it with my homemade cream cheese icing, it is even better!  When my parents visited us on their wedding anniversary, my daughter and I decided to make this cake for them... but, it would also work for birthdays or any other special occasion you can come up with :) 

Ingredients (double for a  large layer cake):
dry:
2 1/4 c unbleached flour
3/4 c cocoa powder
2 t baking soda
1/2 t sea salt
wet:
1/2 c butter, softened
2 c packed brown sugar
3 eggs
1 1/2 t vanilla extract
3 T coconut oil, melted
1 c sour cream
add last:
1 c boiling water

Preheat the oven to 350 degrees F.

Mix all wet ingredients, then mix in dry.  Add boiling water last and mix until smooth.

Butter and flour 9"x13" glass pan (if making cupcakes, this should make about 32).  Bake 35 minutes for cake, about 15 minutes for cupcakes.  Test with a knife to make sure center is cooked.

Top with cream cheese icing:
4 oz cream cheese, softened
1/4 c butter, softened
4 c powdered sugar
pinch salt
1 t vanilla extract
milk or cream (enough to get thick icing)

Blend together until smooth.  Add milk or cream as needed- a little goes a long way!

Saturday, October 6, 2012

Homemade Tarte aux Poires

I have to admit- I am not the biggest fan of pears.  I always seem to buy them either when they're too hard or too soft, or they just have a funky texture!   But, cooking them takes care of all of these problems, and the taste is fabulous when mixed with a little cream and butter :)


For the crust, I used a recipe from The Junior League of Lafayette, Louisiana.  It called for shortening and white flour, so I tweaked it to make it better- and was it tasty!

For the crust:
1.5 c spelt flour, sifted + enough to work with hands
1/2 c butter or coconut oil, solid but not too hard
1/2 t baking powder
1/4 t sea salt
1 egg + milk to make it fill 1/4 cup

Mix flour with fat with a fork or pastry cutter.  Then add the rest of the ingredients until dough is soft and will not stick to your hands (I added a little more flour and worked it with my hands).

Roll out dough to 1/4" thickness and place in 6"x9" rectangle pan -OR- 9" pie pan.
Keep the trimming to make top crust.

Filling:
I had about 8 pears, sliced to make disks, about 1/4" thick. (Place pear on its side and slice from top to bottom, discarding any seeds and stem)
Baste the pears with a mixture of 1/2 honey 1/2 water, heated to combine.  This may take about 1/2 cup of each.  Then, broil the pears on a greased cookie sheet until slightly browned.

Place pears onto crust, then pour over top:
1/2 c cream, mixed with 2 T sugar,  1/2 t salt, and 1/2 t cinnamon

Then, cut up one stick of butter into T pieces and scatter over the filling.

Cover with remaining strips of crust and bake at 400 F for 15 minutes.
Reduce heat to 350 F and bake for an additional 60 minutes.

This tarte is best eaten cold and topped with whipped cream or ice cream!  Enjoy!

Thursday, September 20, 2012

Homemade Wormer for Pets


I am happy to say that my dogs are not on any medications.  Aside from being slightly overweight, our 7-year-old lab mix is a happy, healthy middle-aged pooch.  Our 4 month old Doberman is also very healthy, despite living in a region of the country known for lots of mosquitoes, ticks and other parasites.

Recently, I discovered (through a Yahoo group) that Guinness Beer can be used as a wormer for pets and I was excited to do some independent research on the subject... To my surprise, this remedy has been studied in Japan and is used in many animal rescue centers when the animal is too weak for conventional treatment, mainly for heart worms.  Yes, this treatment kills heart worms!

From my research, I learned:

1. The Black Label Guinness Draught (see photo), which is brewed in Dublin, Ireland, is the ONLY beer that works for worming pets.  This is because of the ancient strain of hops used in the brewing process.  The hops actually causes the worms to become sterile, so they are no longer able to reproduce.  (In conventional treatments for heart worms, the worms "know" they are being poisoned and release harmful toxins into your pet's bloodstream.)

2.  DOSAGE should be 1oz beer per 25lbs body weight.  For prevention, the first two doses should be two weeks apart, then monthly from then on.  To treat a severe case of worms, you may up the dosage to every 2 weeks for the first 3 months, then back off to a once-monthly dose.

3. The small dosage does NOT get your dog drunk.  After their first dose, my dogs showed no signs of dizziness or sleepiness. 

4. The beer will keep in the fridge between doses, even if it goes flat.  If you don't drink Guinness (like I do), just put the cap back on between doses and stick it in the back of your fridge... I have to admit, I just drank what was left in the bottle :)  YUM.

5. In addition to dogs, this treatment has been used successfully in cats, dogs and ferrets!  And, you could see die-off of parasites the same day of the first treatment.

**I read in one article that whip worms will not be affected by this treatment... ? I'm curious to know why, but haven't found an answer yet. **

So why pump your animals full of expensive drugs when the answer is right in your fridge?  Get your pets off the prescription meds and let them enjoy a happy, drug-free life! 


For additional research, see these sites:
http://briarwoodpups.blogspot.com/2011/10/beer-as-wormer.html
http://wiki.answers.com/Q/Can_beer_kill_heartworms
http://www.examiner.com/article/the-guinness-heartworm-challange

Friday, September 7, 2012

Homemade (EASY) Sourdough Sandwich Bread

I haven't been this excited about a recipe in a long time!  I found a sourdough recipe online, then I tweaked it by using real ingredients and it turned out great.  Two of my children ate sandwiches on this bread today, and they were all impressed- and my kids are picky about their bread! 

Here's what you'll need for this easy-peasy sourdough recipe:

1 1/2 c warm water
1 1/2 t real salt or fine Celtic salt
1/3 c rapadura
1/2 c liquid coconut oil
6 c flour (I used unbleached all-purpose)

1.  Mix all ingredients into a large bowl.  You may need to add more flour or water to get a good consistency, depending on the hydration of your starter (that's fancy talk for the proportions of water to four).
2.  Knead the dough until it is elastic (I think I kneaded for a total of 5 minutes) and dough doesn't stick to your hands.
3.  Place dough into a large greased  bowl- I greased mine with butter.  This is how is should look at this point:


5.  Let your dough sit overnight, covered with a damp cloth.  In the morning, it will have risen a good deal!  Mine was nearly busting out of the bowl.  Punch it down and knead it again (5 minutes).  Add small pinches of flour, if needed.
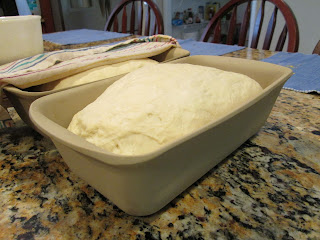
6.  Divide the dough into two loaves and place in bread pans to rise again.  I did not grease my stoneware pans.


After the second rise (about 2 hours), your dough should have doubled:


7.  Bake your loaves in a 350 degree F oven for about 40 minutes.  They are done when golden brown and sound hollow when tapped:


I was impressed with the rise of this bread.  The sugar in the recipe really helped the sourdough starter take off, and there was no sweetness in the finished product!  This bread is perfect for a sandwich loaf- it cuts very well and the crust is thin and easy for picky eaters to ignore :)


Check out this other sourdough recipe! Or this more advanced loaf... Enjoy!

Wednesday, August 15, 2012

Homemade Probiotic Slushies

Well, the heat of the summer is just relentless, and I am searching for more ways to cool us off.  This idea came to me the other day when I saw a friend of my son with a nasty 7-eleven slushy, made with tons of sugar and not much else... The sound of something cooling and fruity really got my gears turning and here's what came of it:  Kombucha Slushies! 

Not only are Kombucha Slushies thirst-quenching, but they pack a power punch of probiotics!  (Try saying that five times fast.)  Sugar content is very low and depends on how much fruit juice you add to the kombucha ice...


Here's what you'll need to make your own homemade slushies:

*about 2 c kombucha (I had strawberry kombucha, so that's what I used), frozen and broken up-or-frozen in ice trays.
*organic or fresh-squeezed grape juice

As you can see, I am using a magic bullet blender to make my slushy, but a carafe blender would probably work better, since you may have to add more juice while blending.


Add a small amount of juice to your kombucha ice and mix in a blender.  If mixture is too thick, just add additional juice until desired consistency is reached.


Here you go!  A thick, frozen treat for a hot summer day!  As you can see, there are even bubbles from the kombucha.  My kids couldn't get enough of their kombucha slushies and they made me promise to make it again tomorrow :) 

Treat yourself with a cooling, probiotic treat and Enjoy!

Sunday, July 15, 2012

Homemade Frozen Yogurt

It's hot out there!  Summer is a great time to make cool treats for yourself and your kids- frozen yogurt is no exception.  Don't be fooled; the "frozen yogurt" from the store has so many additives, it hardly has any yogurt at all!  On the other hand, my homemade version is mostly yogurt.  With a little added sweetness from maple syrup and berries, it is a hot-weather must-have.  :)


For this treat, you will need:

about 3/4 c frozen berries (I used organic strawberries from a local farm)
1 cup non-flavored, whole milk yogurt (I used homemade raw yogurt)
2 T maple syrup (or other unprocessed sweetener of choice)

I used my Magic Bullet blender to mix all the ingredients thoroughly.  This can be done in any blender/food processor or with an immersion blender.


Here is the very inexpensive ice cream maker that I bought last year.  It has two half-pint freezer bowls in which it makes a softy-serve type ice cream/yogurt.  What I like about this little gadget is that the yogurt was frozen in less than 5 minutes!  Very nice when my four kiddos are ready for a snack.  This recipe makes one half-pint, which will satisfy about 2 youngsters.  Just double or triple the recipe for a larger crowd!


Voila!  Here is my homemade frozen yogurt just 5 minutes later.  This was a treat for me, also, because I am a big strawberry fan!  So creamy and just sweet enough to satisfy my sweet tooth :)
Enjoy!

This post was shared on Monday Mania at the Healthy Home Economist.

Saturday, July 7, 2012

Homemade Sushi Rolls

I have always enjoyed sushi.  Ever since my first trip to a sushi bar, I have wanted to make my own at home... now that I am older and have more confidence in the kitchen, I make sushi regularly!  It is a very light but filling meal and so easy when you get the hang of it.

Most people are squeamish because they think all sushi is raw, but it's not!  In the following recipe I use smoked salmon, but you could very easily substitute crab meat or make an all-veggie roll- the choice is yours.


Here are the filling ingredients for my sushi roll!  I am using:

3 oz cream cheese
1/4 Japanese cucumber, peeled and sliced thin (you could also use a regular-variety, but be sure to remove seeds- you could also use avocado instead.)
3 oz smoked salmon (you could substitute smoked tuna, crab or leave it out altogether!)
about 1/2 c cashews, crushed


One of the staple ingredients for sushi is nori, or seaweed wrap.  I got a package of 6 from my local grocery store.  For this recipe, you will need two sheets of nori.


The bamboo mat is a special tool for making sushi rolls.  It is not necessary, but it makes things a lot neater!  When making sushi, I cover the bamboo mat with wax paper to prevent any spillage on the bamboo, which can be hard to clean.  Other people may use plastic wrap, but I find that wax paper is easier to work with.


Sushi also calls for rice, but not any rice!  My local grocery sells Sushi Rice, as well as the seasoning for it.  You will need 1 c rice for this recipe (rinsed until water is almost clear, then cooked in 1 1/4 c water.)  When the rice starts to boil, simply turn off the burner and let it sit, covered, on the warm burner for 20 minutes! To your cooked rice, you will need to add 1 1/2 T rice vinegar (non-flavored),  1 T sugar and a pinch of salt.  Stir until mixed.


I spread the rice on a cookie sheet to let it cool while I am heating the seaweed sheets in a warm oven (to make them more pliable).  Leave the sheets in a warm oven for about 4-5 minutes.


With wet hands, spread the cooled, seasoned rice onto nori.  If you do not keep your hands wet, more rice will stick to you than the seaweed!


When the rice is spread evenly, place 1/2 the filling off-center on top.  Then, very carefully, start to roll your sushi away from you on the bamboo mat. 


Make sure you do not roll the wax paper into the sushi roll.  :)


At the end of the roll, give the sushi a firm squeeze.  This is just to ensure that the roll will not unwrap.


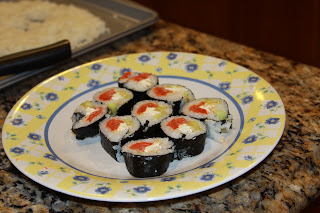
Here is sushi roll #1!  I had a little spillage on each side... if you are a neat freak, you are welcome to trim this off to make it look more professional.  Then, with a wet knife, cut your roll into 9 pieces and arrange on a plate!


Even though this sushi looks good enough to eat right away, you need to make the second roll while the nori is still warm! :)  Be sure to serve your sushi rolls with naturally fermented soy sauce and wasabi paste- everyone will be amazed that you made these yourself! Enjoy!


 I wanted to show you my 7-year-old's chopsticks!  We found this neat little gadget made especially for kids, and I had to get one.  We call them his "clothes-pin chopsticks" because they have the same spring mechanism of a clothes pin... and they are great for little hands.

Wednesday, June 20, 2012

Homemade Kefir D'Uva Champagne

I came upon a really neat website about kefir-making a while back, and I had to share this wonderful recipe for making a home-brewed "champagne" that is suitable to drink with any gourmet dinner!  As stated in the original website, this is an alcoholic beverage and should never be served to children... but, if you and your husband are having a romantic dinner or hosting a dinner party, this drink is sure to please you and your adult guests :)

You will need either spare milk or water kefir grains.  Since my water kefir seems to double after every batch, that's what I have been using!  Neither kind of kefir grain will multiply in a fruit juice kefir, but they will retain the ability to ferment.  The grains will also take on the color of the grape juice and become a lovely shade of purple!  If you only have access to quality white grape juice, this can be substituted successfully.

In addition to the kefir grains, you will need:
a glass mason jar- any size
quality grape juice (preferably fresh-squeezed or organic)
water


Fill your mason jar about 1/2 way with grape juice, then top it off with water.  Add kefir grains (about 1/4 cup per pint of liquid).  You can see how dark the mixture is in the picture above... and how much it has lightened up after 48 hours in the picture below.


When your "champagne" has finished brewing, strain out the kefir grains and bottle the remaining drink in air-tight glass bottles.  You can stick this directly in the fridge, as it will be plenty bubbly right out of the jar!  As soon as it's chilled, take a sip- delicious!- and I recommend sips, not gulps. :)
Enjoy this probiotic-rich adult beverage with your sweetie and know that you are doing your tummy good!

You can continue using your lovely purple kefir grains for subsequent batches of home-brewed champagne.

Sunday, June 17, 2012

Homemade Pumpkin Bread

Earlier this spring (around here, spring comes early), my kids discovered a volunteer pumpkin plant that was sprouting in the back field.  I decided that since it sprouted on its own, we would let it be... I tend to have a black thumb when it comes to gardening, so that was a wise decision on my part!  Lo and behold, last week we picked a very nice-sized pie pumpkin. :)

I have made pumpkin pie from scratch before, and it was delicious, but this time I opted for something a bit different:  pumpkin bread!  The recipe I adapted is from an old cookbook, written by the Junior League of Lafayette, Louisiana.  


Ingredients:
1 3/4 c sifted flour
3/4 t salt
1/2 c coconut oil
2 eggs
1/3 c water
1 t baking soda
1/2 t cinnamon
1/2 t nutmeg
1 c cooked, mashed pumpkin *
1 c organic sugar
1/4 c honey
1 c chopped pecans (optional)

Mix everything until smooth.  Bake in large buttered bread pan (I used a Pampered Chef stoneware bread pan, and it was perfect.) 1 hour at 350 degrees F. 

This bread also freezes well!

The flavor and texture reminded me of my mothers zucchini bread.  Since the pumpkin is so mild in flavor, the spices really come through, and it was so very moist!  As you can see in the picture, the pumpkin made the bread a lovely shade of yellow. :)  Enjoy!

* To cook a pumpkin, just cut it in half and remove the seeds. Place the sides skin-side-up on a greased cookie sheet.  Bake for about 1 hour on 325 degrees F.  Scoop out the meat and discard the skin.

Monday, May 28, 2012

Homemade, Naturally Fermented Soda

I have had a lot of small projects going on lately.  I think it's because both our cars are out of commission and I have a lot of spare time on my hands... and because making things is just so darn fun! :) 

The soda recipe that I recently made is from a blog called Learning Herbs.  If you want to view the original post, click here.

The kids and I picked some wonderful Florida blueberries a few weeks ago, and this was a perfect project to use up 6 cups of them.  I assume you can use any kind of berry/fruit with this recipe, or just make ginger soda with your "bug" (which I have done before).

To make the "bug", or soda culture, needed to naturally ferment your homemade soda, fill a quart mason jar 1/2 to 3/4 full of filtered water (non-chlorinated).  Add 1 T freshly-chopped ginger root and 2 t unprocessed sugar and stir until sugar is dissolved.  Let it sit 24 hours, then add 2t ginger and 2t sugar.  Repeat this process until your mixture is good and bubbly.  My "bug" took only 4 days to reach maximum bubbliness!  


While you are building your "bug", make sure to cover it with a secured cloth to prevent any contaminants from finding their way in.


Here's my "bug" after only 4 days.  The natural yeasts on the ginger root are very active and ready to culture some soda!


For the next part of the soda-making process, you will need:

6 cups berries/fruit
1 1/2 c unprocessed sugar
1 gallon filtered water
1 cup soda "bug"
glass gallon-sized jar

Pour your berries into a large cooking pot and add 1/2 gallon filtered water and sugar.  Bring to a boil, then reduce heat and simmer for about 10 minutes. 

Pour into your gallon jar, then top off with more filtered water.  Be sure to leave room in the jar for your "bug" and for a little expansion from the fermentation!  When the mixture has cooled, add the "bug" and stir.  Be sure to stir the mixture a couple of times every day thereafter.


Here's the fermenting vessel I used for the soda.  And, after about 3 days, my vessel looked like this:


When your  soda looks this bubbly, you may choose to go ahead and bottle it!  If you prefer a less- sweet soda, you can let the fermentation continue for another few days- up to a week.


I chose to bottle mine on day 3.  (Before bottling, make sure you filter your soda with a large strainer or colander.)  Since I have had homemade soda bottles explode on me before, I am putting mine in the fridge right away.  The original recipe called for a second fermentation in the bottles, but I'm a little paranoid about exploding glass.  So, I will keep mine in the fridge for another week or so, then I will test the carbonation and go from there!  If you choose to leave your bottles on the counter for another 2-3 days, please check the carbonation every 12 to 24 hours so that an accidental explosion is less likely!  I would rather be cautious than sorry. :) 

Enjoy your homemade, probiotic-rich sodas with family and friends.  Feel good about serving a healthy soda to the people you love!

Homemade Sour Cream

Have you ever read the label of a store-brought sour cream?  It's not just cultured cream, is it?  Well, it should be.  I'm sick of commercial food products being loaded with unnatural preservatives, thickeners and "flavor enhancers"!  Sheesh.  What do I do about it, you may ask... I make my own :)


Above is the label from a sour cream container we go a while back... I now use this container to hold dry snacks for my children.  As you can see, there is (probably GMO) cornstarch, guar gum and carageenan, among other things.  Why, oh why do they need to ruin this usually yummy condiment?

For my homemade version, you will need about a quart organic cream (preferably raw) and 1/4 cup buttermilk.  I bought the least gummed-up buttermilk I could get from the store, although it still had "annatto coloring" as the last ingredient.  I do not own buttermilk culture, so this had to do.

Pour the cream into a glass storage container (a mason jar would work, also) and stir in the buttermilk.  No heating required- just mix it together cold!  Then, let the mixture sit on your kitchen counter for a full 24 hours, covered with a rubber band-secured cloth.


And, voila!  after the culture sours your cream, you are left with a very large batch of goodness!  Although mine was very creamy when the 24 hours was up, it continued to firm up after I put it in the fridge.  It has the same consistency as that cornstarch-ridden store-bought sour cream, and I didn't have to thicken it at all!

Enjoy your sour cream in soups, sauces and as a Tex-Mex condiment.  So glad I don't have to yell at the ingredient labels in the store any more! :)

This post shared on Monday Mania.

Friday, May 25, 2012

Homemade Yogurt Cheese and Whey

Yogurt Cheese is probably one of my all-time favorite snacks.  It is fresh-tasting, very filling, and perfect for a mid-afternoon pick-me-up.  Whole milk yogurt cheese is packed with probiotics, healthy fats and energy, and it tastes like heaven!

Since I didn't have any homemade yogurt on hand, this batch is made with an organic, whole milk, store-bought yogurt.  Greek yogurt will have substantially less whey, but I used American yogurt because I have other plans for that whey!

The first step in making yogurt cheese is finding a filter suitable for separating the cheese and whey.  I used a coffee filter because it fit very well into the jar that will catch the whey.  You could also use a spare cloth, such as layered cheesecloth.


I fit the coffee filter into the opening of my jar and scooped in a fair amount of yogurt.  You can use whatever sized jar you have on hand!  If the opening is large, you might want to secure the filter/cloth with a rubber band around the lip of the jar.  Since my jar was small, I just folded the filter over, as you can see in the above picture...

Let the whey drain out of your yogurt for at least 4 hours.  The longer you let it sit, the thicker the cheese will get.  This last batch I made was on my counter all night, and it turned out to be thick like cream cheese!  (I let mine separate on my kitchen counter, but you could move your jar to the fridge during this process.)


This is how I eat my yogurt cheese! :)  The small amount that I made (around 1/4 cup) was more than enough to satisfy, and by adding fresh Florida blueberries and a drizzle of honey, it was a sweet treat!  Peaches, strawberries or mangoes would also be delicious in yogurt cheese.

The whey that I collected can be kept in cold storage for up to 6 months.  I use whey for fermented veggies and beverages!  For more information fermented beverages, click here.  For a great recipe for fermented green beans, click here.

Wednesday, May 9, 2012

Homemade Sourdough Starter

Sourdough is a treat- one of my family's favorites.  I have kept starter in my refrigerator since I made it over two years ago.  So, it was a sad day in our house when I accidentally killed my culture.  Yes, I killed it.  Let's just say that it was death by bacon grease...

Thankfully, sourdough starter is not hard to make!  I have a new batch in my fridge as I write this, and I just started it a week and a half ago.


Here's what you need to make your own sourdough starter:
1/4c  flour ( I used unbleached, then added whole wheat- use whatever you have on hand.)
1/4 c water

That's it!  Mix the two ingredients in a canning jar and cover it with a clean piece of cloth, secured with a rubber band- I used a piece of an old tee shirt.

Next comes the waiting... and waiting...you get the idea!  Every 12 to 24 hours, you need to "feed" your starter with equal amounts flour and water (about 1/4 cup each time).  If your starter begins to reach near the top of your jar, just pour off up to half of it before a feeding.  The sour flavor that gives sourdough its name develops better in small batches anyway :)


This is my starter on day 4.  Finally, some signs of life!  My patience has paid off, and there are tell-tale bubbles in my starter- this means I have captured the wild yeasts in my kitchen.  They are happily feeding on all the gluten in my flour mixture.  But, it's not done yet!  Even though the yeast is there, my starter hasn't yet developed the yummy sour smell that a ripe starter should have.  Time to wait again... and wait... and wait.  Go ahead and keep feeding the starter until a nice, yeasty, sour smell develops.  You decide when it's done- mine took an extra four days for it to become this:


Here's my finished starter!  It is soured and ready to use in breads, pancakes and bagels!!  There are so many wonderful things you can make with sourdough, and if you're nice to your starter, it can live in your refrigerator for years and years.  My deceased starter has many children in the fridges of my friends, and I intend to spread the love with this new starter as well! 

When your starter reaches this stage, you can cap it with a tight-fitting lid and pop it in the fridge.  When you want to use some, just get it out several hours in advance and let it warm up on the counter (covered with a cloth).  Before you cover it back up and store it, be sure to feed it equal amounts flour and water to keep it happy :).  If you do not use your starter for a week-ish, just feed it and store it again.

If your starter gets a funky smell (like acetone), sometimes you can bring it back by adding a T plain yogurt! 

Enjoy making treats for your family and friends with sourdough starter! 

For recipes, click on the type:

This post was shared on Real Food Wednesday at Kelly the Kitchen Kop.

Wednesday, April 18, 2012

Homemade Pulled Pork Salad with Honey Mustard Dressing


I was craving a salad a couple of days ago, but I really wanted to eat something filling as well. I remembered I had some wonderful, homemade pulled pork in the freezer and got a great idea- a pulled pork salad! I started with a head of organic iceberg lettuce and half a tomato (chopped). Then, I simply added a large scoop of the thawed pulled pork on top and added a bit of shredded cheese. You could easily throw on some of your own favorite veggies, too!

I used to have this type of salad at a place called Shyler's Barbecue in Evansville, IN. I would order the salad and top it with a delightfully sweet poppy seed dressing- YUM. Since I didn't have any poppy seed dressing at home (or a recipe), I decided to top it off with a homemade honey-mustard dressing instead.

Honey-mustard is the easiest dressing to make! All you need is equal parts raw honey and spicy Dijon-style mustard- that's it! Although honey can be quite thick, when mixed with the mustard it becomes very viscous. I was able to drizzle it with ease from my cheap plastic squeeze bottle :)

Needless to say, my homemade, restaurant-style salad was delicious! Try making your own salads and dressings at home- you will taste the difference fresh, nutritious ingredients can make! For more ideas for dressings and sauces, click here.

Friday, April 6, 2012

Homemade Kimchi (Korean Sauerkraut)

"Kimchi" has got to be the Korean word for "delicious"! If you like spicy things like I do, this will certainly be a treat. Kimchi is a great condiment for meat dishes or just eaten out of the jar. I certainly don't let it sit long in my fridge.


I used to buy kimchi at (of all places) Walmart! But, like many other good, nutritious foods, it has disappeared from the shelves and I am forced to make it at home. No matter, it is a challenge I am up to! With a power-punch of digestive helps like ginger, probiotics and cayenne pepper, I have to have my kimchi. :)


The recipe I have adapted is originally from Nourishing Traditions, by Sally Fallon. It is a must-have cookbook for all those real foodies out there!


Here's what I put in my homemade "delicious":
1 head Napa cabbage, cored and shredded
1 small onion, minced
1 c carrots, shredded
1 T freshly grated ginger
4 cloves garlic, peeled and minced
1/2 t cayenne pepper powder
2 T Celtic sea salt

Place all ingredients into a large mixing bowl and pound with something heavy until juices are released. I used the end of a wooden dowel rod, but you could also use a meat hammer.
Move kimchi to a canning jar and press down until juices come to the top. Make sure there is at least 1 inch of head space in the jar, then cover tightly. Leave the jar out on the counter for 3 days, then move it to the fridge!

Enjoy! Your taste buds and your tummy will thank you :)

Homemade Continuous Brew Kombucha

I love my kombucha :). It is wonderful as a morning pick-me-up or sipped with a meal. I have always made my booch in small batches, usually 1/2 gallon canning jars, but recently a friend has re-introduced me to another method... continuous brewing!
I first read about this technique when I started making booch many years ago, but like many beginners I thought I had to purchase all the fancy equipment sold online. Needless to say, the expensive ceramic brewing crocks were a little out of my price range! My friend has proven to me that all that expensive stuff is really unnecessary, so I've decided to give it a go. Thanks, Deb!


This is a party drink container that I bought about a year ago. It was on sale at a local discount home goods store and I had to have it... since then, I have used it a total of 2 times. For lemonade. So, I was glad to get it out of storage to use as my continuous brew set-up! It is attractive, so I don't mind it decorating a dark corner of my kitchen. And, since it is larger than my previous brewing vessel, I can make large batches of yummy booch!


Here's the vessel I have been using for the past few brews. It holds one gallon of booch, but it's a pain in the rear at bottling time! I have to move my scoby to another container in order to bottle the liquid, then pour the booch (clumsily) into canning jars, then rinse the container and start a new batch from step one. With a continuous system, you can skip a few messy steps between brews!


I've bottled my booch from the previous batch with fewer spills than usual and have set them aside for a short second fermentation with strawberries as a flavoring. This second fermentation takes only about 2 days, then I move the jars to the fridge.


Here is my finished continuous brew set-up! I am really excited to see how the first bottling goes. I'm sure it will be less messy and time-consuming than the one I did earlier today! And, I have made use of a purchase that would otherwise be left under the counter gathering dust until the next birthday party. :)

For more information about brewing your own kombucha, visit these websites:


Kombucha Kamp

Happy Herbalist (continuous brew)

But, don't be fooled into buying expensive equipment! :)